7 Months in the Potato Freezer

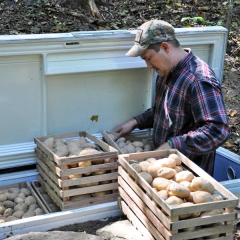
I’ve  been meaning to post this for a long time now.  We’ve been using this system for over five years and it has met our needs well, providing plenty of potatoes from harvest to harvest.  This is what any remaining potatoes look like after wintering in the freezer.  As of mid-May in Ohio, they’re just starting to sprout, but most are still very firm and taste great.  None are rotting or smelly. The Kennebecs seem to fare better than the Pontiacs (red) which can be a little bit softer.

We pull out a bunch to take to the house to eat over the summer and then use the rest for “seed potatoes.”  I’m not sure what “best practice” would be in terms of selecting potatoes for seed (maybe reserving the biggest, nicest ones for this purpose?)  It’s tempting to cook those ones up, and honestly we always seem to have plenty so I just never gave it much thought, but it could be  worth considering, especially if you are limited on garden space.

Once it’s consistently warm outside, I do recommended dealing with potatoes in the freezer one way or another as they will begin to deteriorate in the summer heat.

Comments Off on 7 Months in the Potato Freezer

Filed under Food Storage, Gardening, Homesteading, Uncategorized

Fabric Balls

We’ve had a lot of fun with these simple fabric balls.  I orignially made them when expecting our second baby…soft balls my son could roll to his baby sister.  Of couse, he and my husband immediately saw their potential as dodge balls!  So, in other words, they’re fun for all ages with multiple uses, easy to grab, don’t hurt when they hit you, and are a great way to use up little odds and ends of fabric.  The tutorial I found at The Purl Bee includes templates for 3 sizes and easy-to-follow directions (including  adding circles on the ends like beach balls.)

1 Comment

Filed under Sewing, Toys

Craftoire

Clyde made this amazing craft cupboard (which we named the craftoire) during our first years of marriage.  It has its own light and work surface with space for tons of supplies at my fingertips.  I keep my sewing machine in the bottom drawer, which also has a suspened filing system.  There is also a shelf directly below the work surface for my portfolio, cutting mat, and larger paper.

2 Comments

Filed under Furniture, Organizing

Pantry-Building Resources

There seem to be two main camps when it comes to long-term food storage.  One approach involves setting aside a quantity of food and supplies for emergency purposes and leaving it untouched for a year or more.  Wendy DeWitt offers a plan for this approach in her book Everything Under the Sun.  In the other approach, supplies are rotated through regular use, a method I first learned about from Donna Miller at Grain Storehouse who describes it as a long-term workable pantry.  While there are advantages to the first method (more cut-and-dry, less regular inventory to worry about) and there are times that I do implement this method (emergency car kits and bug-out bags) I’ve found the second to be a better fit for my preferences and purposes.

Advantages of the Long-Term Workable Pantry
– fresher ingredients due to more frequent rotation
– greater familiarity preparing and eating pantry items
– more compatible with the use of real foods with less preservatives

Helpful Sites  Here are some of the many excellent websites that have helped me in developing my long-term workable pantry:
Kitchen Stewardship
Miller’s Grainhouse
– Simply Living Smart

Podcasts  I find audio is easier to integrate into my day than lots of hours in front of the computer, so for me podcasts have been even more helpful as I’ve been trying to assimilate information about building a long-term workable pantry.   The podcasts below can all be found on iTunes and many also cover other subjects of interest to preppers and homesteaders:
Nature’s Harmony Farm
New Life on a Homestead
Preparedness Radio Network (especially “Your Preparation Station” program)
Stumbling Homestead
Harvest Eating
Survival Podcast

3 Comments

Filed under Food Storage, Homekeeping, Preparedness

Pastured Poultry Paddocks

Once the coop was designed and built we were on to thinking about the outdoor set-up for our new flock.  Although free-range was appealing in terms of chicken nutrition/feed costs and quality of life, we were concerned about the many potential predators and also wanted more control over where (and on what) our chickens roamed.  I was investigating different types of chicken runs when I learned about chicken tractors and discovered the pastured poultry methods developed by Joel Salatin of Polyface Farms.  At first I was disheartened to think our coop design had been a big mistake and that we should have gone with something small and mobile.  Then I heard Jack Spirko interview permaculturalist Paul Wheaton on the Survival Podcast and knew his paddock shift system was exactly what we were looking for.  Paul’s article explains the idea in detail and gives an overview and comparison of other systems. 

The basic idea is to create four or more fenced areas (or use portable fencing) and rotate the flock so that each area gets at least 28 days of rest before reuse .  This allows the plant life to benefit from the grazing and fertilization and rebound becoming increasingly lush over time (intensive rotational grazing.) 

Our paddock set-up has a permanent access run with four rotating paddocks.  Each has some shade provided by nearby trees.  So far it seems to be working well.  We’ve been shifting the same day each week, which only gives 21 days of rest, so we probably need to adjust that for optimal results, it’s just harder to keep track of a 9/10-day rotation.  It’s really nice to have fresh forage for them and to know they’re not going to be swiped up by a wandering neighbor dog. 

One predator issue remains in the hawk we often see inspecting the yard.  We’ve considered using netting or even strands of wire and have thought about some type of shelter item that could be moved from paddock to paddock.  I would prefer to see some type of evergreen shrubbery or other tall plant (like the peony bushes growing along the access run where they like to hang out) rather that additional structures, but it would take time for most plants to be big enough to make much of a difference.  Ideally we’d have all kinds of established trees and plants that provide additional food inputs  incorporated into the design.  One of our hens ended up being a rooster, and he’s been taking his watch-dog, protective role very seriously, so maybe that will make enough of a difference safety-wise. 

Anybody else trying a paddock shift system?  Any hawk safety suggestions from the veteran chicken farmers out there?

23 Comments

Filed under Chickens, Homesteading

Mud Pie Kitchen

We included a shaded sandbox play area in our garden plan to give the kids something nearby to do when they tired of helping with garden chores.  This was especially helpful when E was in his 2-year-old wandering phase as the garden is also fenced.  Now E spends countless hours in his sandbox whether I’m in the garden or not.  Recently one of his favorite activities has been playing restaurant and making “smoothies” and other concoctions to serve me as I work. 

When I saw this post:  Creating a Mudpie Kitchen on “Rhythm of the Home” I knew it was right up his alley.  Before long, we had whipped up this arrangement, and we continue to look for more accessories (thrift store dishes, empty spice containers) as we go.  Since the play area also runs alongside the chicken run, it also makes a great spot for a chicken drive-through.  “Would you like some wild strawberries or chickweed with those grubs?”


16 Comments

Filed under Homeschooling, Outdoor Play

Burying a Freezer


We had a bumper crop of potatoes last year.  After freezing them (as fries, casseroles, etc), canning some, and giving over 200 lbs away, we needed a reliable way to store the rest.  The goal was to have enough potatoes stored to take us through to the next harvest…and possibly never to have to buy potatoes again.  We didn’t have a basement or root cellar (or time/funds to build a full-blown root cellar), so we had to get creative.  Clyde remembered his dad talking about burying old chest freezers for overwintering vegetables and we decided to give it a try.  His sister’s freezer had recently died and so was recruited for the job.

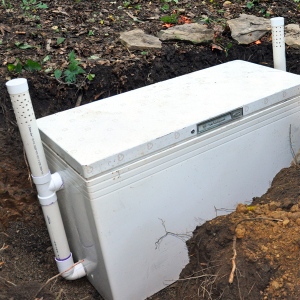
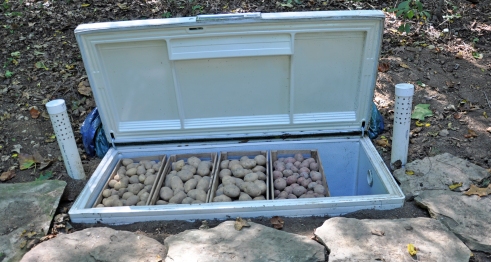
Clyde removed all of the working parts and cut two holes in each side.   (Note:  if your appliance still contains freon, certified individuals can be hired for freon removal or these services may be available at area junk yards or recycling centers.)  To the holes he attached PVC pipe for air circulation.  When in the ground, it looked like someone had buried a semi.  A tarp was partly buried as well in order to protect the freezer and allow easier access during icy conditions.  We later added a sheet of insulation under the tarp as well.  Clyde made crates for easier storage and better air circulation.With hopeful trepidation, we packed away our harvest.  We were careful to store only the best potatoes and packed the smaller ones in the upper boxes so we’d use them first.

I’m pleased to report that our deep-freeze root cellar had great results!  Mid-winter the potatoes looked just as we’d left them.  In early spring only a little bit of sprouting had occurred.  Later in the spring we sorted through some of the more deteriorated ones to use as seed potatoes for this year’s crop.  Now, in late June, they are not as attractive out of the box, but most still scrub up well, are quite firm and have a good taste and texture.  Although a true root cellar is still on the wish list, it’s nice to find an easy, inexpensive solution that works so well.

This post is part of Homestead Revival’s Homestead Barn Hop.  Check out the rest of the great homesteady ideas and information by following the link!

78 Comments

Filed under Food Storage, Gardening, Homesteading